In this blog post, we provide a step-by-step guide on how to dynamically replace part of a string in Power Query. Whether you’re cleaning up product codes, categories, or any other text column, this guide walks you through building a single, reusable step that can handle multiple partial replacements at once.
Replacing a full column value in Power Query is easy with the built-in Replace Values feature. But what happens when you only need to replace part of a string, and the replacement depends on what that string contains? In this blog post, we walk you through a real example step-by-step!
Introduction
Power Query’s Replace Values feature is great when you want to swap out an entire cell’s contents, but it isn’t built to replace just a portion of a string, especially when different rows need different partial replacements. For that, we need to write a bit of M code.
The scenario we’ll use to demonstrate is a table of standardized produce codes. The problem is that the data comes from a manual entry process, and some of the codes have been entered incorrectly:
- Product codes that should end in “-NEW” were instead entered ending in “-O”.
- Product codes that should end in “Y” were instead entered ending in “X”.
- Product codes with a last-three-digit code of “ABC” were instead entered as “DF”.
In each case, only part of the string needs to change; the rest of the product code should stay exactly as it is. So, how can we replace these values dynamically, all in one step? Follow along to find out!
Want a quick M code reference sheet to follow along? Download our free M guide one-pager!
We put together a simple, easy-to-follow M guide one-pager to help you follow along.
-
Free M Guide: Replacing Part of a String Replacing a full column value in Power Query is easy with the...
-
Free M Guide: Replacing Part of a String Replacing a full column value in Power...

Step 1: Open the Advanced Editor
In Power Query, click Advanced Editor from the Home tab. This is where we’ll add our custom step, right after the last applied step in the query.
Step 2: Add a New Step
Every applied step in Power Query lives inside a single M expression, and each step is separated from the one before it by a comma. So, right after your last applied step, whatever that happens to be named in your Applied Steps pane, add a comma, then start a new line. On that new line, type a name for your new step, followed by a space, an equal sign, and another space. In M, this is simply how you tell Power Query “I’m creating a new step, and here’s what I’m going to name it.” In our example, we’ll call this step Partial_Replacement:
# "Previous Step Name",
Partial Replacement =
A couple of things to note here: #”Previous Step Name” is just a placeholder. It represents whatever your actual last step is called, which you’ll see listed just above this line in your own M code, and it should already be there since you didn’t type it yourself. Also, at this point we haven’t written anything after the equal sign yet. If you tried to run the query right now, it would give you an error, since a step can’t end on an equal sign with nothing after it. That’s expected; keep going.
Step 3: Function Call
Now, directly after the equal sign from Step 2, we’re going to call a function named Table.TransformColumns. This function does exactly what its name suggests: it takes a table and applies a transformation to one or more of its columns, all at once. It needs two pieces of information, called arguments, separated by a comma:
- The table you want to transform, in our case, this is simply the result of the previous step, so we reference it by typing its name.
- A list telling it which column(s) to transform, and how.
For now, type the function name, an opening parenthesis, and the name of your previous step as the first argument, followed by a comma. Your step should now look like this:
# "Previous Step Name",
Partial Replacement = Table.TransformColumns(#"Previous Step Name",
Notice that #”Previous Step Name” appears here again, this time as the first argument inside the parentheses. This tells Table.TransformColumns which table to start from. We still have one more argument to add, the list describing what to do to our column, which is where the real logic happens, in the next step.
Step 4: Reference the Column & Build the Logic
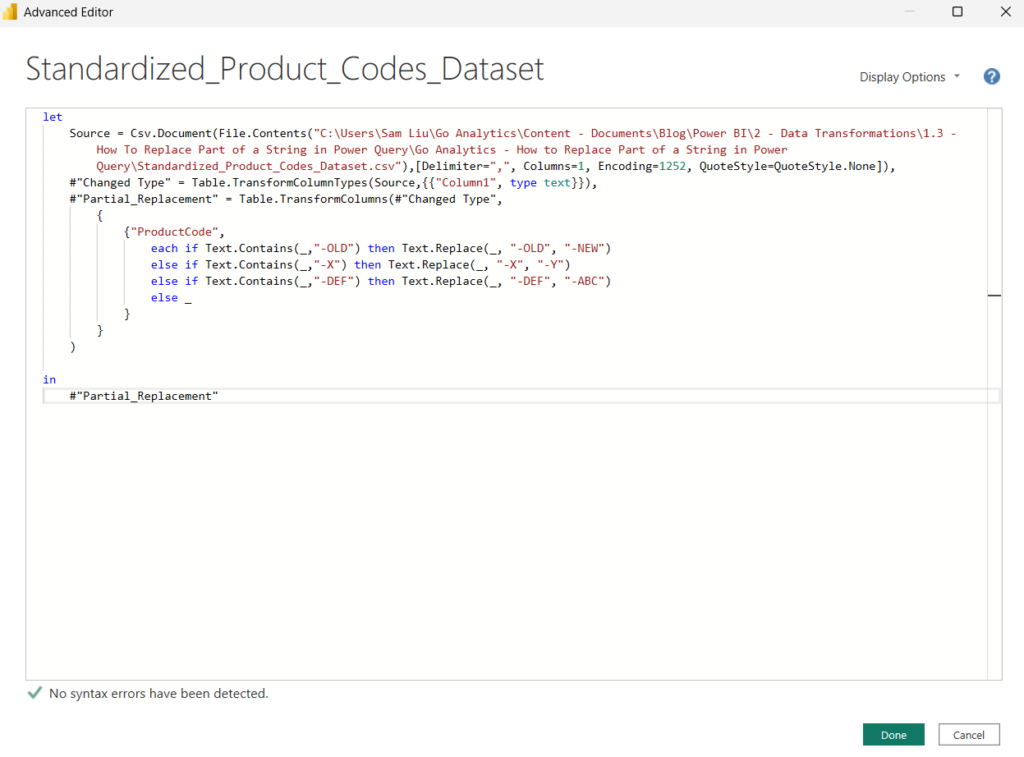
The second argument of Table.TransformColumns is always a list, which in M code is written using an outer set of curly brackets { }. Inside that outer list, you add one more set of curly brackets for every column you want to transform. Each of those inner sets contains exactly two things, separated by a comma: the column name, written in quotes, and the function to apply to every value in that column. Since we only want to transform one column in our example, we only need one inner set of curly brackets, referencing our ProductCode column:
#"Partial_Replacement" = Table.TransformColumns(#"Changed Type",
{
{"ProductCode",
each if Text.Contains(_,"-OLD") then Text.Replace(_, "-OLD", "-NEW")
else if Text.Contains(_,"-X") then Text.Replace(_, "-X", "-Y")
else if Text.Contains(_,"-DEF") then Text.Replace(_, "-DEF", "-ABC")
else _
}
}
)
in
#"Partial_Replacement"
To summarize what happens when this step runs: Power Query goes through the ProductCode column one row at a time. For each row, it first asks “does this value contain ‘-O’?” If yes, it replaces just that “-O” with “-NEW” and moves to the next row, the rest of that condition is skipped entirely. If no, it asks “does this value contain ‘X’?”, and if that’s also no, it asks “does this value contain ‘DF’?”. If none of the three questions are true, the final else simply returns the value exactly as it was found, with no changes. Every row in the column is evaluated this way, which is what lets us adjust column values based on three different logics in one step.
Step 5: Apply & Review
Once we click Done in the Advanced Editor, we see that every product code ending in “-O” has been updated to end in “-NEW”, every code containing “X” now contains “Y”, and every code containing “DF” now contains “ABC”, all in a single applied step, without touching the rest of each string.
A Note About Handling More Conditions
This pattern scales nicely if you have more than three replacement rules to apply. Each additional condition is just another else if line, following the same structure: check for the substring with Text.Contains, then swap it out with Text.Replace. As long as you keep a final else to return the original value, you can safely add as many conditions as your dataset requires, all within the same step.
It’s also worth remembering that this approach only replaces part of a string based on a match, it doesn’t require the substring to be in a specific position within the value. If you need to match on position instead (for example, only the last three characters), you can combine this same structure with functions like Text.End or Text.Start.
The other consideration is about performance. If you are working with very large datasets and many of your column values need to be replaced, you may find that your reports are not quick to load up and data refreshes may take longer.
To avoid sluggish performance, it is always best practice to perform data transformations as far upstream as possible. Meaning, if you can replace the column values right at the source of the data, for example in a SQL Server View, it is recommended.
Wrapping it Up...
Dynamically replacing part of a string is a step up from Power Query’s built-in Replace Values feature, but it’s just as approachable once you see the pattern: Table.TransformColumns to target a column, Text.Contains to check each value, and Text.Replace to swap out only the piece that needs to change. It’s a small trick, but one that can save a lot of manual cleanup, especially with messy data.
Need Help Getting Started With Power BI?
Our Microsoft Certified consultants can help with the implementation of Power BI in your organization