
In this blog post, we provide a step-by-step guide on how to filter data by a list in Power Query.
Filtering a table in Power Query usually means clicking a dropdown and manually checking a few boxes. But what happens when the list of values you want to filter by lives in its own table, and changes from time to time? Manually re-checking boxes every time isn’t exactly dynamic. So, what’s the solution? Follow along.
Introduction
Power Query’s built-in filter dropdowns work fine when you’re filtering by a small, static set of values. But if you already maintain a separate list of the values you care about, for example, a list of client IDs, product codes, or regions, it’s much more efficient to filter directly from that list instead of re-selecting checkboxes every time it changes.
The scenario we’ll use to demonstrate this involves two queries: a Province and Region table, and a GDP Estimates table that breaks down GDP by province, year, and industry. Let’s say we want to filter the GDP query down to only the provinces that appear in a shorter, hand-picked list, for example, only the western provinces of Canada. The best part is that once this is set up, changing which provinces appear in our list automatically updates the filter on the GDP query, no extra clicks required. Okay, enough describing, let’s set it up!
Step 1: Filter your Reference List Down to What You Need
Start with the query that holds the values you want to filter by, in our example, we call this is the ProvList query, which lists every province and territory name in Canada and their respective regions. Since we only want to filter down to the Western provinces for now, we apply a filter on the Region column so that only those provinces where Region is Western remain.

At this point, the query is just a regular table, filtered down to the rows you care about. The next step is turning our Province/Territory Name column into something Power Query can use inside a filter condition.
Step 2: Convert the Column to a List
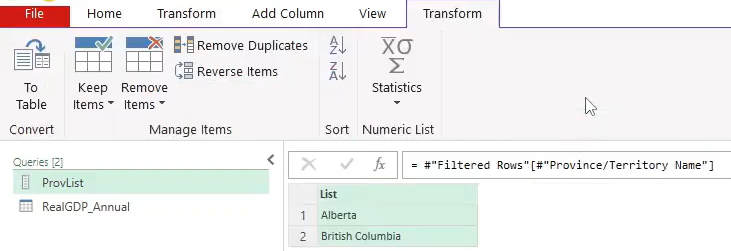
With your filtered query still open, select the column that holds the values you want to filter by, in our case, that’s the Province/Territory Name column. Then, go to the Transform tab and click Convert to List.

Once you do this, the query changes shape entirely, and you’ll notice the icon next to the query’s name in the Queries pane changes too, confirming that this is no longer a table, but a list. This list is what we’ll reference in the next step to filter our other query.
Step 3: Apply List.Contains to Filter the Data
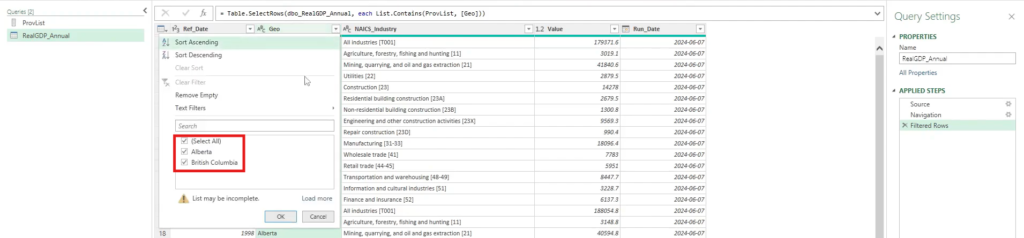
Now we switch over to the query we actually want to filter, in our example, that’s the GDP Estimates query. We find the column we want to filter, the Geo column, and apply a quick filter on it by selecting any single value. This gives Power Query a filter step to build on, which is the easiest way to get started with the least amount of manual coding.
Open that filter step in the formula bar (or head into the Advanced Editor if you’d rather see the full query at once), and replace everything inside the round brackets of the filter condition with the following function:
List.Contains(ProvinceList, [Geo])
List.Contains takes two arguments: the list you want to check against, and the value you want to check for. For the first argument, reference the list you created in Step 2 (Power Query’s IntelliSense will usually suggest it for you as you type). For the second argument, reference the column you’re filtering, in this case, our Geo column. Once you confirm the step, the GDP query filters itself down to only the rows whose Geo value appears somewhere in your province list.
Step 4: Test With a Different List
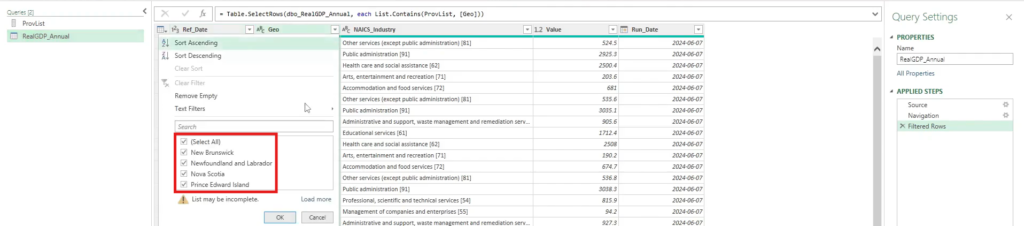
Here’s where this approach really pays off. Go back to the filter step on your reference query, the one from Step 1, and change which provinces it keeps. For example, swap the filter from Western provinces to Atlantic provinces instead. Now head back over to your GDP query and refresh.
Without touching the List.Contains step at all, the GDP query automatically updates to show only the Atlantic provinces this time. Because the filter step references the list itself, rather than hardcoded values, any change you make upstream flows straight through to the filtered result.
An important distinction here, is that we are not aggregating the GDP by the provinces in our ProvinceList – we are simply filtering our GDP table based on that list. To learn how to reduce your data tables by aggregating values, be sure to read our How To Reduce Data Tables Using “Group By” in Power Query blog post.
Wrapping it Up...
Filtering a query by a list is a small change from filtering by hand, but it makes a big difference once your criteria starts changing regularly. Convert your reference column to a list, drop a List.Contains function into your filter step, and from then on, updating the list is all it takes to update your filtered results.
Need Help Implementing Power BI at Your Organization?
Our Microsoft Certified consultants can help
![Read more about the article [How To] Change Data Source Location in Power Query](https://goanalyticsbi.com/wp-content/uploads/2023/07/Change-Source-Data-Location-300x157.png)
![Read more about the article [How To] Append Queries in Power Query (Power BI & Excel)](https://goanalyticsbi.com/wp-content/uploads/2023/10/Appending-Queries-300x157.png)