
![You are currently viewing [How To] Remove Unwanted Columns in Power Query Editor](https://goanalyticsbi.com/wp-content/uploads/2023/03/Remove-unwanted-columns-in-PQ.png)
In this blog post, we show you how to remove unwanted columns in Power Query. Throughout the blog post you will find instructions on how to remove columns and some notes on best practices when working with data in Power Query.
Note
While we are accessing Power Query through Power BI, keep in mind that the process would be the same if you are performing this task in Microsoft Excel.
Power Query is a powerful data transformation engine inside of Microsoft Excel and Power BI that allows business users and data analysts to transform and shape data from various sources. One common task that users can perform in Power Query when working with data is to remove unwanted columns from raw data sources.
It is often the case that when you connect to your data sources – especially SQL databases – your query will bring additional columns that you will not need to perform your analysis. Keeping these additional columns in your Power BI or Excel report will weigh it down and reduce the performance (i.e., longer load times).
Best Practice
It is always good practice to remove all unnecessary columns from your data model to optimize report performance.
Removing unwanted columns in Power Query is quick and easy. The remainder of this blog post lays out the steps to follow to remove unwanted columns in Power Query.
Need Help Getting Started With Power BI?
Our Microsoft Certified consultants can help with the implementation of Power BI in your organization
1. Open Power Query Editor
To start, open the Power Query Editor from Power BI or Excel.
To launch the Power Query Editor in Power BI, you can click the Transform data button from the Home tab.

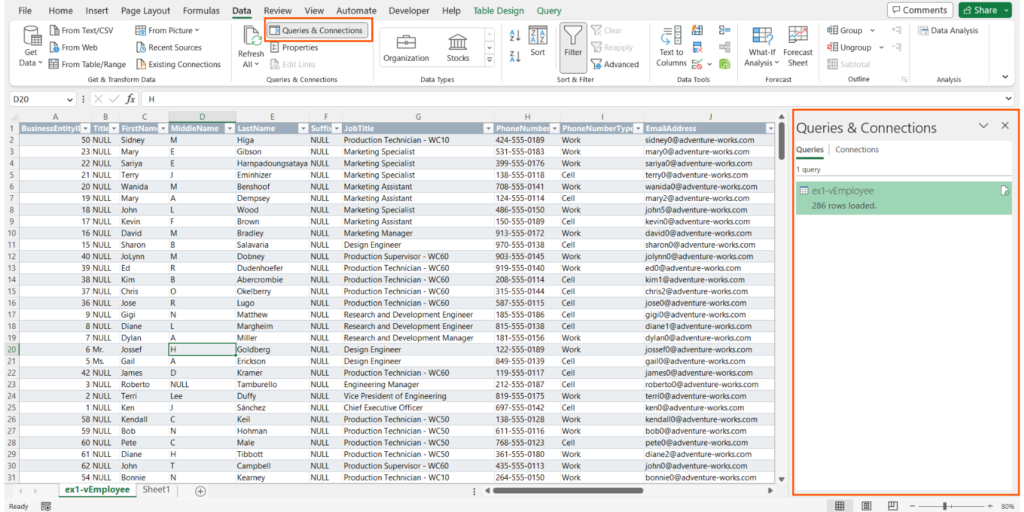
In Microsoft Excel, navigate to the Data tab and then select Queries & Connections to reveal the Queries & Connections pane on the right-hand side of your screen. To launch Power Query Editor, simply double-click on the query you wish to edit (or right-click and select Edit).
2. Select Columns to Remove
Once you have opened the Power Query Editor, you will see a preview of your data on the screen. Look for the columns that you want to remove. To select multiple columns, hold down the Ctrl key while clicking on the column headers.
3. Remove Selected Columns
With the unwanted columns selected, click on the Remove Columns button on the Home tab in the Power Query Editor. Alternatively, you can right-click on the selected columns and choose the Remove option.

Tips & Tricks for Removing Columns in Power Query
There are a couple of handy ways to remove many columns all at once without having to manually select each.
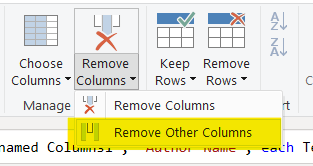
Remove All but Selected Columns
If you have a dataset that you wish to remove most columns except for a select few, you can use the Remove Other Columns from the Remove Columns button in the Home tab. To do this, select the columns you wish to keep in your dataset by holding down the Ctrl key and selecting each column. Next, you can expand the Remove Columns option and click on Remove Other Columns. This will remove all columns except the ones you have selected.
This method is a good way to remove many columns when you only need to keep a few selected columns.
Select Multiple Columns to Keep
If you have a dataset with many columns and you want to select which columns to keep, you can use the Choose Columns button from the Home tab. Selecting Choose Columns opens up a dialogue window that allows you to see all of the columns in your dataset and choose which ones you wish to keep.
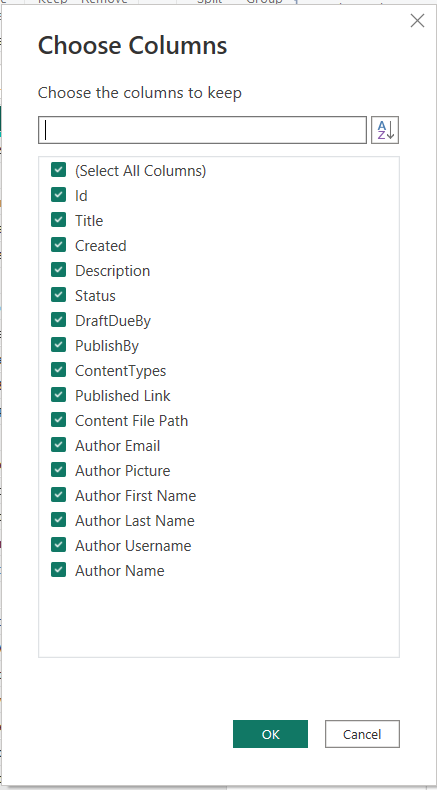
By default, you will notice that all columns are selected. You can use the check boxes to unselect undesired columns. Alternatively, you can deselect the Select All Columns check box and then just select the columns that you want to keep.
This method is great for quickly seeing all the columns in your query and then selecting which ones you want to keep or remove.
Conclusion
Removing unwanted columns is a common task when working with data, and Power Query makes it easy to perform this task. By following the steps outlined in this blog post, you can quickly remove unwanted columns from your data and prepare it for analysis. Additionally, the tips and tricks provided can help you work more efficiently with your data in Power Query.
![Read more about the article [How To] Align single value card visual in Power BI](https://goanalyticsbi.com/wp-content/uploads/2021/01/Align-Card-Visual-300x157.png)
![Read more about the article [How To] Create a histogram and cumulative frequency distribution chart in Power BI](https://goanalyticsbi.com/wp-content/uploads/2022/12/Blog-Feature-Image-Template-2-300x157.png)