
![You are currently viewing [How To] Import Data from SQL Server into Power BI](https://goanalyticsbi.com/wp-content/uploads/2023/01/Blog-Feature-Importing-data-from-SQL-Server-to-Power-BI.png)
In this blog post, we will discuss how to import data from a SQL Server database in Power BI and some best practices to follow to ensure a smooth and seamless connection.
In 2022, Microsoft SQL Server continued to be among one of the top databases in the world. The Stack Overflow 2022 Developer Survey found that nearly 29% of all professional developers, in their sample of 48,788, were working with or wanted to work with Microsoft SQL Server.
If you are a data analyst or business intelligence professional looking to connect to your SQL Server data inside of Power BI, this blog is for you.
Connecting to a SQL Server database in Power BI is a simple and straightforward process, but it is essential to understand how to set it up correctly to ensure that your reports and visualizations are accurate and efficient.
To begin, open Power BI Desktop and select Get Data from the Home tab [1]. This will bring up a menu of different data sources that you can connect to, including files, databases, and online services. Select SQL Server as the data source. If this is a few too many clicks, you can simply click the SQL Server button right from the Home tab under the Data section [2].

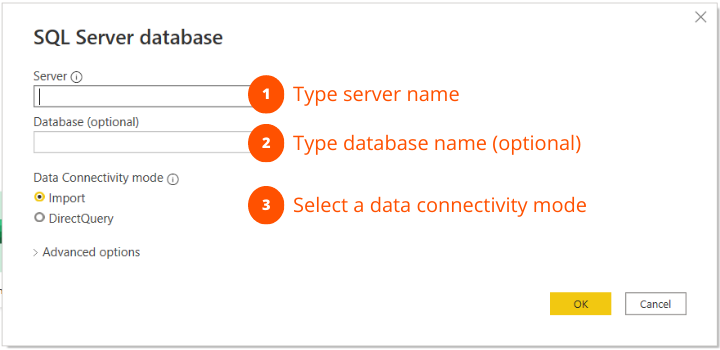
Both options to initiate a connection to SQL Server mentioned above will open the SQL Server connection window, where you will need to enter the server name and database name that you want to connect to. It’s worth noting that entering a database name is not mandatory, as leaving this field blank will give you the option to select the correct database in the next step in Power BI.
Need Help Getting Started With Power BI?
Our Microsoft Certified consultants can help with the implementation of Power BI in your organization
If you have already set up a connection to the SQL Server database, you can choose to use a specific connection instead of entering the server and database name manually. This can be particularly useful if you frequently connect to the same database or if your organization has a centralized data management system.
One of the most important steps in connecting to a SQL Server database in Power BI is entering the appropriate credentials. If your database requires a username and password, enter them in the appropriate fields. Keep in mind that the credentials you enter will determine the level of access you have to the database, so it’s essential to use the correct credentials. If your organization uses Active Directory or other single sign-on solutions, you can also choose to use your windows credentials.
When working with a SQL Server database in Power BI, you have a few options when it comes to data retrieval methods. One option is to use DirectQuery, which retrieves data directly from the data source every time a user interacts with the report. This approach is useful when working with large data sets, as it ensures that only the data that is needed for a particular report is retrieved. However, it may result in slower performance than using the other option available in Power BI, which is import mode.
Import mode retrieves the data from the SQL Server database and stores it in the Power BI model. This allows you to query the data more quickly, but it also requires more disk space on your machine. One of the key benefits of using import mode is that you can work with the data offline, which can be useful if you need to work on a report while you’re traveling or don’t have an internet connection.
In general, if you have a small-medium data set and your report is going to be consumed by a small number of people, you may choose the Import mode. But if you have a large data set, or your report is going to be consumed by many people, you may choose DirectQuery mode.
Once you have entered the necessary information and selected a data connectivity mode, click on the OK button to establish a connection to the SQL Server database. Depending on the size and complexity of the database, this process may take a few minutes to complete. Once the connection is established, you will be able to see the tables and views in the database in the Navigator window. Select the tables or views that you want to use in your report and click Load to load the data directly into the data model or Transform data to launch the Power Query Editor and make transformations to your data.
It is important to consider the structure of your data before loading it into Power BI. Take a moment to review the tables and columns and make sure they are structured in a way that makes sense for your report. If transformations need to be made to your data, you can click Transform data to launch the Power Query Editor.
Additionally, consider the size of the data you are working with, as large data sets can have an impact on performance. If you have write access to the database, it is always best practice to reduce your data at the source (i.e. database) by creating views that summarize your data. To quote one of Power BI’s greatest, Matthew Roche, “Data should be transformed as far upstream as possible and as downstream as necessary”.
Once you load the data, you will be able to create various reports and visualizations based on the data in the SQL Server database.
That’s it!
Having the right credentials and understanding the differences between Import and DirectQuery data connectivity modes is all you need to know to start bringing your SQL Server data into Power BI.