When it comes to storing, organizing, and working with data, Microsoft Excel is a staple in many offices across the world. It is an amazing tool to organize and store data, and make basic data manipulations such as calculations, and it is used widely across many industries.
Microsoft Excel can be used for keeping track of budgets and bills, having a good handle on your team’s productivity, and organizing grades.
While Excel offers some built-in data visualization capabilities, you can easily integrate your Excel data in Power BI for a better visualization experience; or for when you are trying to combine your data from Excel to data you may have stored in other databases (i.e. SQL, CSV, CRM, etc.).
Connecting to Excel data (.xlsx files) is quick and easy in Power BI. Let’s see how we can connect to our Excel workbooks in Power BI Desktop!
Once we have Power BI Desktop open there are a couple of different ways we can go about connecting to our Excel data.
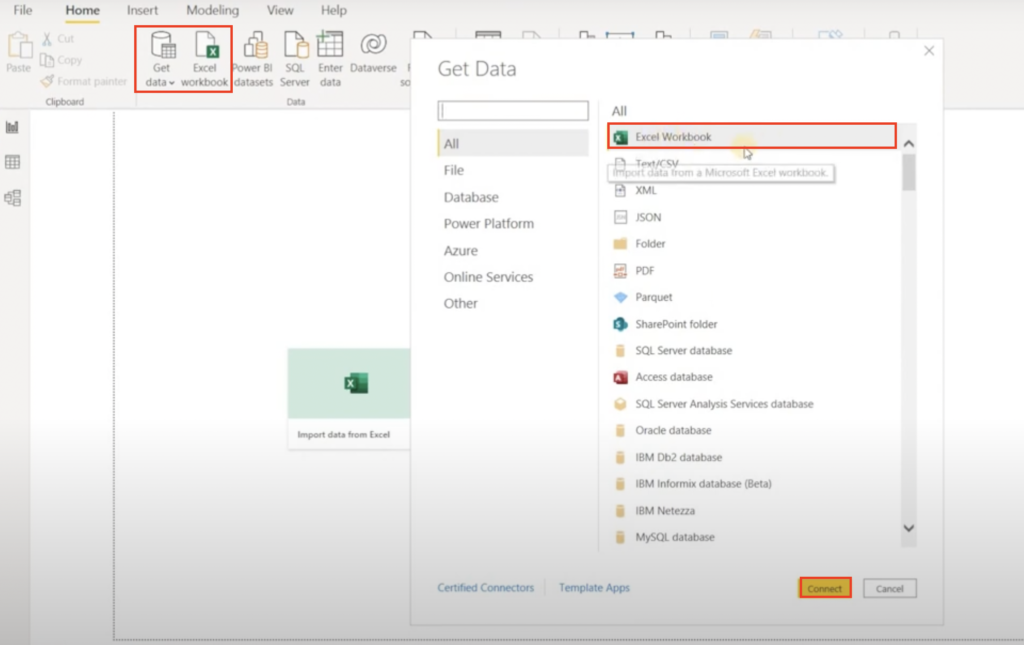
The first, and easiest way, of connecting to our Excel workbook is to just click on Excel Workbook right from the Home tab. This will open up our file explorer so we simply need to navigate to where the file is stored on our computer and click Open.
The second option is to expand the Get data menu, which is also located on the Home tab, to see all of the different data sources that we can connect to in Power BI. Once the menu is expanded, we will see that one of the top data sources we can choose from is an Excel Workbook. This data source is conveniently at the top given that it is one of the most common data sources. After clicking the Excel Workbook option from the Get Data menu, the file directory will open like in the previous step.
Whether you choose to connect via clicking the Excel Workbook button from the Home tab or expanding the Get data menu and then clicking Excel Workbook, you will arrive at the same spot as is common for Microsoft to allow users to perform the same task in different ways.

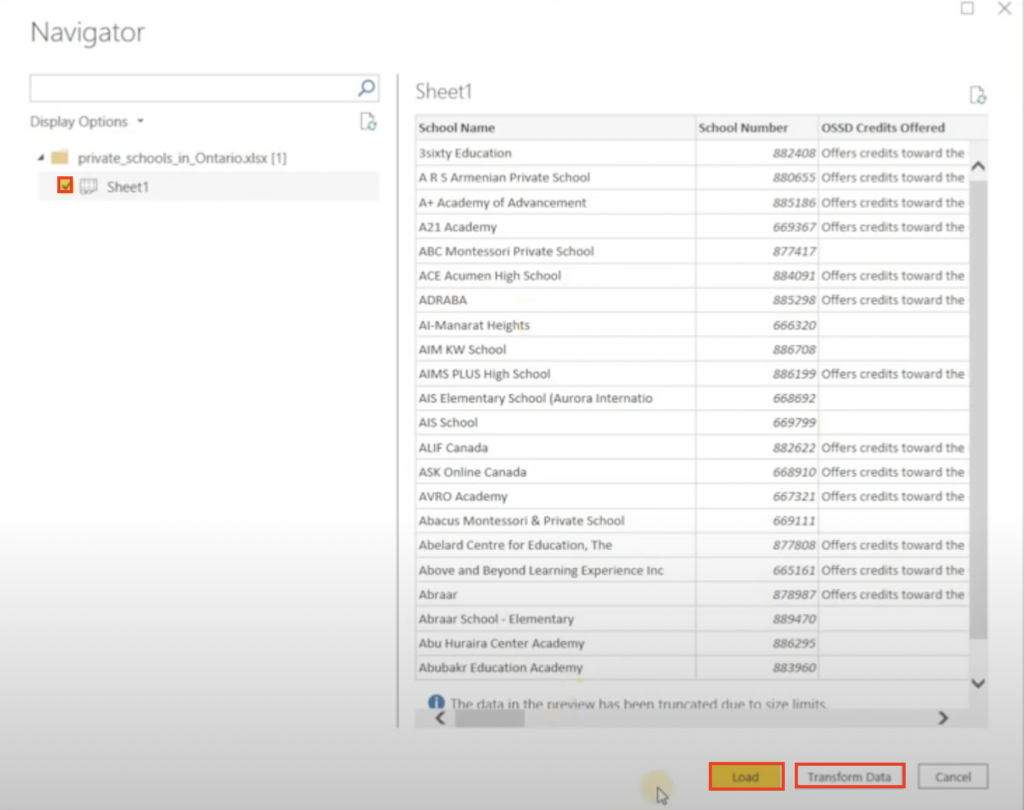
After we select our Excel file, Power BI will automatically detect any worksheets that are in the workbook. We can click on it to get a preview of the data and make sure that it contains the right data table we wish to load to our data model. If your workbook only has one worksheet, this is the only worksheet you will see available. Also note that Power BI will bring in your worksheet names to make it easier for you to spot the one you want to visualize.
Before we proceed to loading the data to our data model, the Load and Transform data buttons will be greyed out. To load or transform our data, we have to click on the check box to the left of the worksheet name. Once this is done, then we will have the options of loading our data or transforming it prior to loading to the data model.
The difference between clicking on Load or Transform data is that the former will load it to our data model as is, whereas clicking on transform data this will open up the Power Query Editor and we will be able to clean up our data and make any transformations before we load the data. If you are working with a clean dataset and it looks ready to go, you can just click Load but if you want to make some changes you must click on Transform data.

If you are working with a workbook that has multiple worksheets in it, you may bring them all into Power BI simultaneously. You will simply have to click on the checkbox beside each worksheet name. Once the data is loaded, each sheet will be loaded in as a query.
Transferring your Excel data into Power BI is a seamless process, given both tools are in the domain of Microsoft. Following the steps we outline above, you can now easily make use of your Excel data in your Power BI reports. Bringing our data from Excel into Power BI Desktop will allow you to visualize your data better than ever!
Need Help Getting Started With Power BI?
Our Microsoft Certified consultants can help with the implementation of Power BI in your organization

![You are currently viewing [How To] Connect to an Excel Workbook in Power BI Desktop](https://goanalyticsbi.com/wp-content/uploads/2022/11/Connect-to-Excel-in-Power-BI.png)


![Read more about the article [How To] Change Data Source Location in Power Query](https://goanalyticsbi.com/wp-content/uploads/2023/07/Change-Source-Data-Location-300x157.png)