In this blog post, we provide the steps required to change data source location in Power Query. If you need to migrate a data source file and are now running into the ‘DataSource.Error’ error in Power Query, then this blog is for you.
Note
screenshots of Power Query in this blog are from inside Power BI, but the user interface in Excel is similar.
It’s a nice feeling when you set up a beautiful data model and visualizations, but next time you try and refresh your report you come across an unexpected error – the ‘DataSource.Error’ error.

Need Help Getting Started With Power BI?
Our Microsoft Certified consultants can help with the implementation of Power BI in your organization
If you are new to Power Query, whether you are accessing from inside Power BI or Excel, then the first time you come across the ‘DataSource.Error’ can be scary. But, not to worry, this one is an easy fix.
This error is commonly encountered when Power Query tries to fetch new data from the data source but doesn’t find the data source in the current location specified. This can be happen under a couple of scenarios – the data source file has moved to a different location, or the file has been renamed.
Dealing with this error requires handling the data source location for the file or changing the file name in the file path. As is common in Microsoft products, there are a variety of ways of performing these tasks.
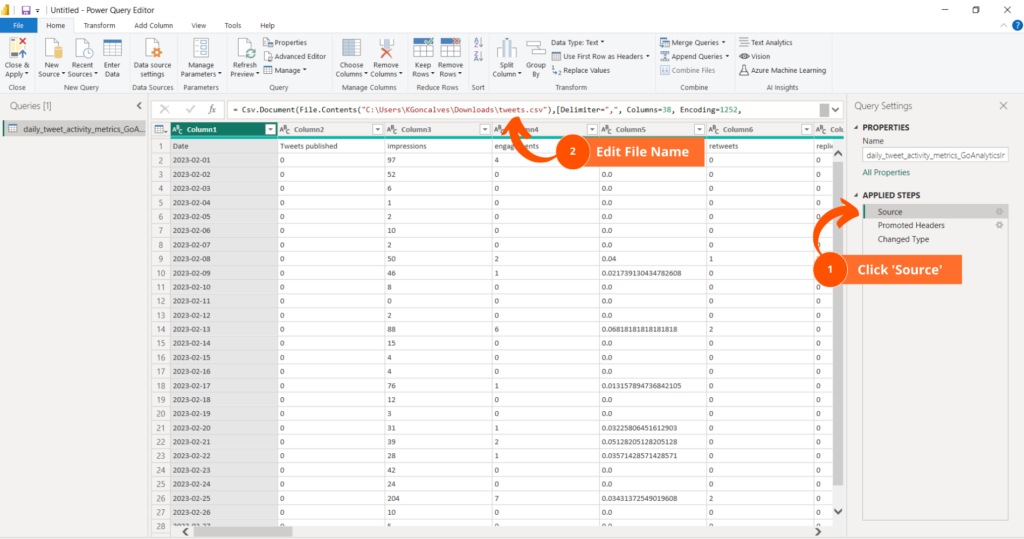
If your data source file has been renamed, one option you have is to simply rename the file in your query inside of Power Query.
To do this, from inside Power Query, navigate to Applied Steps under the Query Settings pane and then click on Source. Next, you can use the formula bar to alter the file name in the file path. Alternatively, you can also change the file name by opening the Advanced Editor and editing the file name in the code.

If your data source file has moved location, or if you don’t want to rename your data source file in the code and would rather just repoint Power Query to the renamed data source file, then we can use the data source settings to change the data source location.
There are two different ways of changing the data source location in Power Query and one way to do it from the Power BI Desktop application.
The first method from inside of Power Query is to navigate to Applied Steps under the Query Settings pane and then click the gear icon next to Source. This step will open a dialog box that allows you to browse your computer and repoint Power Query to the right data source file location.
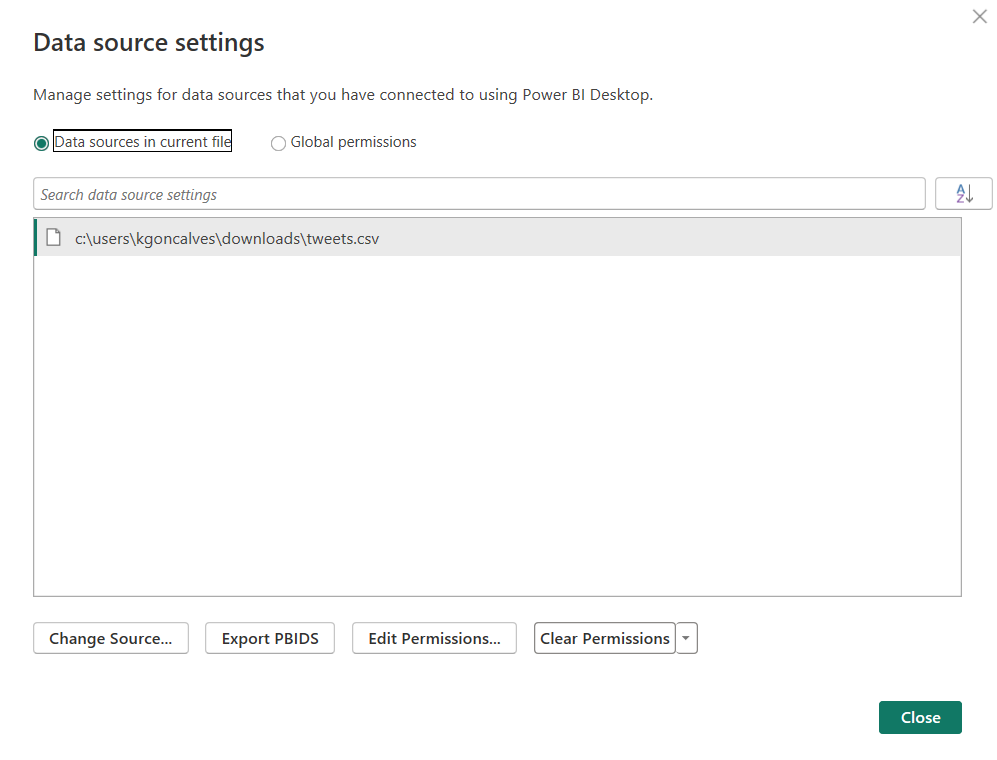
The second method from inside Power Query is to navigate to the Data source settings button from the Home tab. This step will open a dialog box that displays all queries in your data model. After selecting the query with the data source error, click Change Source… to open the dialog box we saw in the previous step. From here, you can browse your computer to repoint Power Query to the correct data source file location.

If you wish to change your data source file location from the Power BI Desktop application, you simply need to expand the Transform data button from the Home tab to expose the option to access the Data source settings. This will open a dialog box identical to the one seen in the previous method, which again, allows you to select the query you wish to modify and click Change Source… to change the data source file location.
After you change your data source file location, your report is ready for a refresh.
Next time your colleagues change a data source file name or location, be chill – you know exactly what to do to get that report up and running again in no time!

![You are currently viewing [How To] Change Data Source Location in Power Query](https://goanalyticsbi.com/wp-content/uploads/2023/07/Change-Source-Data-Location.png)


![Read more about the article [How To] Import data from PDF into Power BI](https://goanalyticsbi.com/wp-content/uploads/2022/12/Import-From-PDF-300x157.png)