
![You are currently viewing [How To] Enter data directly into Power BI Desktop](https://goanalyticsbi.com/wp-content/uploads/2022/12/Entering-Data-in-Power-BI.png)
CHANDLER: All right, check out this bad boy. 12 megabytes of ram. 500-megabyte hard drive. Built-in spreadsheet capabilities and a modem that transmits at over 28,000 b.p.s.
PHOEBE: Wow. What are you gonna use it for?
CHANDLER: [doggedly] Entering data into Power BI and stuff.

Power BI allows you to enter data directly into Power BI Desktop so that you can use this data in your reports and visualizations. This can be useful for copying small portions of a workbook or some snippet of data from an online data table.
Entering your own data directly into Power BI is quick and easy. It is a very similar process to inputting data in Excel or Google Sheets as it is also displayed in a row and column format.
Let’s see how we can input our own data into Power BI!
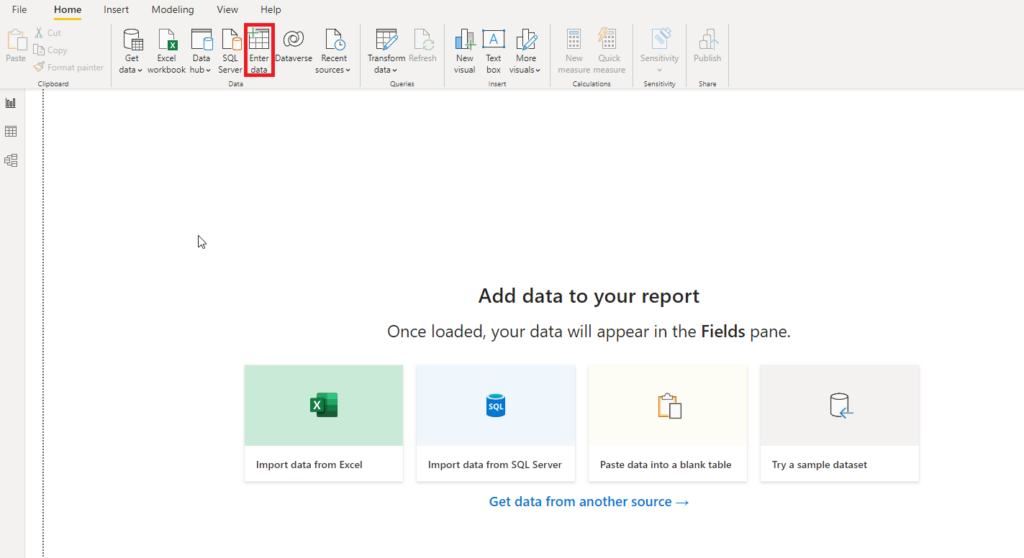
Let’s begin by opening the Power BI Desktop application and navigating to the Home tab. From here, we can click on the Enter data button. This will open up a dialog screen where we can enter our data. On this screen, we can now start typing our data or we can simply paste data we have copied from another source (i.e. Excel workbook or data table on the web).
Need Help Getting Started With Power BI?
Our Microsoft Certified consultants can help with the implementation of Power BI in your organization
Working Through an Example
Let’s say we are making a grocery list. After clicking the Enter data button on the Home page, we can start typing our data or copy and paste from another source.
In general, the first thing we should do is rename the columns respective to the data we are entering. In our case, we are going to name the first column “Item” and the second “Quantity” because we want to know what it is we are shopping for and how many of each item we should put in our cart.
After renaming the columns, we will now have 2 separate columns. We will then input data into these columns, like the items and the quantity we want to buy. To start entering data into a new row, all you have to do is click enter on your keyboard and Power BI will create a new set of empty spaces for us to use. We can keep doing this until we have as much information as we need.
The next step is to rename the table so that it properly represents the data we will input and use.
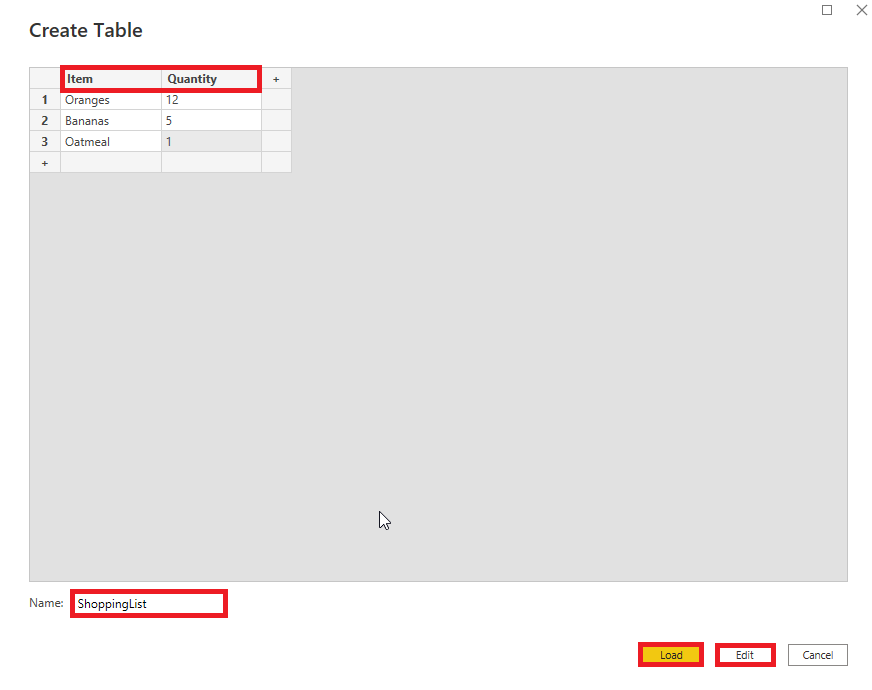
Finally, we can either click the Edit button to open the Power Query Editor and make any modifications to this data, or we can just click Load to load it into our data model, and then we can start making visualizations from this data!
Once our data is loaded into the data model, we can see it as a new table in the Fields pane on the right. We can see the columns in the data table we just created and we can start visualizing this data!
Using the method we just learned, we can now take our visualization game to the next level making it easy to input data of your own! This can help a lot with adding quick and small amounts of data and making it much easier to create Power BI reports!

![Read more about the article [How To] Connect to SharePoint Lists in Power BI Desktop](https://goanalyticsbi.com/wp-content/uploads/2022/11/Connect-to-SharePoint-Lists-300x157.png)